Pages

Showing posts with label science. Show all posts

Thursday, 26 August 2021

Kiwi Fruit DNA Extraction

 Hello guys, welcome to my blog, today I'm blogging about the DNA extraction that we did in Science class. We use kiwi fruit to find the DNA Extraction.


Equiptment: 

  • A kiwi fruit
  • Knife 
  • Water
  • Plastic sealable bag
  • Plastic cup/beaker
  • Coffee filter
  • Bamboo skewer or spatula
  • Test tube
  • Dishwashing liquid
  • Rubbing alcohol
Method: 
  • Cut the kiwifruit into half and the skin.
  • Put half of the kiwifruit into the plastic sealable bag and mush the kiwifruit. 
  • Put a splash of water into the bag with a squirt of dishwashing liquid.
  • Put the coffee filter on top of the plastic cup/beaker. 
  • Pour the liquefied fluid on the coffee filter and collect the juice in a beaker.
  • Carefully pour half a quarter of rubbing alcohol into the test tube. This will cause two different phases.
  • After you see some precipitation, take the slimy wad of kiwifruit DNA. 
  • There you have it! You have kiwifruit DNA.

Result:


Friday, 7 May 2021

The Corrosion Expirement

Hello, guys today blogging about a science experiment that we did this week, I was with my friend Khush while doing the experiment so we have to have like 5 test tubes that we need to use and like there is a letter from A to D. We have to put an iron nail in each test tubes and put like salt but not in the same test tube.

 Corrosion:

When metals are exposed to the environment they can deteriorate, or break down. Scientists call this process corrosion, Rust is the term used to describe the corrosion of iron.


Aim: To investigate the factors that cause rusting in iron.

Equiptment: Four test tubes, test tube rack, a bung, four iron nails, boiled water, tap water, salty water, cooking oil, calcium chloride. 

Method:  

1. Label four test tubes A - D and place them in a  test tube rack.

2. Test tube contents: 

A = Iron nail and tap water

B = Iron nail and salty water.

C = Iron nail, boiled water. oil

D = Iron nail and calcium chlorides. Sealed with a  bung.

3. Leave the test tubes undisturbed for at least three days.


Friday, 9 April 2021

Acid and Bases -SCIENCE

 Hi guys, today im blogging about what we have done on Science Experiments. We have to choose 4 questions about Acid and Bases that we can answer and explain. We have to be in a group and I and my friend Name Khush Answer the 4 questions in the DLO and post them on our blog.

Tuesday, 30 March 2021

Making Salts -Science

Aim: To produce sodium chloride salt by carrying out a neutralisation reaction.


Equipment: 50 ml and 200 ml beakers, dilute HCI (hydrochloric acid), dilute NaOH (sodium hydroxide), 25 ml measuring cylinder, a glass stirring rod, spotting tile, Universal indicator solution, tripod, gauze mat, Bunsen burner, Evaporating basin.

Method:

1. Using the measuring cylinder measure 10 ml of HCL and pour it into your 500 ml beaker.

Add dilute NaOH a few drops at a time while stirring with the glass rod.

2. Every 10-15 drops stop adding the NaOH and use the glass stirring rod to transfer a drop of the solution to a spotting tile. Test its pH using a universal indicator.

 3. Keep adding NaOH and testing the solution by repeating step 2. As you get closer to neutral you may need to test the solution after every drop.

4. Pour the neutral solution into an evaporating basin and evaporate the water out of the solution using the equipment set up shown above.
Acids, Bases and Salts for Class 10NCERT CBSE Class 10 Science Chapter 2 Acids, Bases and Salts PDF
 
Conclusion:

First, we have to do is we have to finish our work in our book before we can do the experiment. My friend who named Khush, he said if I and he can work together about the experiment. After I and Khush finish the work we rush and do the experiment, so first we have to do is get the equipment and then we have to put like 10 ml either acid or base after we got 10ml of either acid or base we pour it in our 50 ml beaker. For example, if we put 10 ml of acid then we have to put like a base and then mix it and put it in the spotting tile, but we only have to put like once and after we put once we have to put like 1 drop of universal indicator and if its turn red it means we need to put more base if it turns purple or blue it means we have to put acid until the colour of the acid turns it to green.  When it turns green we have to pour it into an evaporating basin and then evaporate the water out of the solution using the equipment set up shown above.

Tuesday, 16 February 2021

Physical or Chemical Change

                   (Heating ZnO)

 Hypothesis- Explosion = Chemical change

Equipment - Sample of ZnO (Zinc oxide)

  • Heat source - Hot plate
  • Scales
  • Heatproof container - Evaporating dish
  • Tongs
  • Heatproof mat
Method -   
  1. Get sample ff Zn0 in an evaporating dish
  2. Weigh the ZnO + container - Record weight
  3. Heat container + ZnO on a hot plate
  4. Observe any changes - use the phone for before and after photos (Video?)
  5. Take of hot  + put on a heatproof mat
  6. Let cool - observe - Photos
  7. Re weigh

Results -

The result is the zinc oxide was change colour to light yellow and it has different smells


Conclusion - 

First, we have to get zinc oxide and turn on the  Heat were we going to put the zinc oxide so that where we can see what it changes if its smell different or like changes colour,  First we have to measure the weight of the zinc oxide then after that we have to put it in the hate so we can see what the changes are.

Wednesday, 4 November 2020

Electricity


Static Electricity
A build-up of electrical charges on an object

Current Electricity
A flow of electric charge.

Electrical Charge
electrical particles that are negatively charged

Circuit
A system that provides a pathway for electrical current to flow through

Cell
Supplies energy to a circuit, by pushing current from the positive to the negative end

Voltmeter
A device used to measure voltage, or electrical potential energy difference

Ammeter
A device used to measure current in a circuit

Wire
a thin, flexible thread of metal

Resistor
An electrical device that resists the flow of electrical current

Bulb
In a circuit, this shows if electricity is flowing by lighting up

Switch
a device that opens or closes a circuit

Battery
A device that converts chemical energy to electrical energy


1- Fill in the table


Static electricity

Current electricity

What is it caused by?

The imbalance between negative and positive charges in an objectAn atom usually has the same number of protons  (which have a positive charge) and electrons (which have a negative charge)

Do the negative charges move?

Negative charges can move freely from one object to anotherAn electric circuit is caused by the movement of the charges through the conductors of the circuit.

Does it power appliances?

Electricity usage monitor that tells you exactly how many kWh a device or appliance is drawing.If the electricity provided is desired to do work, the load/appliance can be placed at the middle of the electric circuit


2- What are some examples of static electricity:

  1. If you rub your shoe on the carpet, your body collects extra electrons

  2. When you touch the playground your body get static electricity.

  3. Walking across the carpet and touching a metal door handle and pulling your hat off and having your hair stand on end.

  4. When you jump on the trampoline get electricity static.


Write up for a Van der Graaff experiment:


How does the Van der Graaff machine work?

A Van de Graaff generator pulls electrons from the Earth, moves them along a belt and stores them on the large sphere. These electrons repel each other and try to get as far away from each other as possible, spreading out on the surface of the sphere.


What was one of the experiments they did with the machine?

Is when they hold there hands on the machine and the machine is turning on and the static is all in there body.


Describe what happened, what did you see?

I see when my friend standing there holding the machine and the static was all in there body and their hair was standing up because of the electricity coming on their body.


Why did you see this happen?

Because my friend wanna try it and There hair went up because of the electricity going in there body and the static. I saw the teacher holding the small machine ball and he touches it to the big machine and it static and there is like a static light and the sound is loud.


Explain how lightning happens linking  to the ideas of static electricity


Often lightning occurs between clouds or inside a cloud. As the storm moves over the ground, the strong negative charge in the cloud attracts positive charges in the ground. These positives charges move up into the tallest objects like trees, telephone poles and houses.

What does it feel like to be struck by lightning? | The Spinoff

Wednesday, 21 October 2020

Reflection and Refraction

Definition


Reflection
The bouncing back of a wave when it hits a surface through which it cannot pass.

Refraction
The bending of a wave as it passes at an angle from one medium to another

Incident ray
Incoming ray

Reflected Ray
the light ray that bounces off a surface

Refracted Ray
The Ray that has bent as it enters a new medium

Normal line
An imaginary line is drawn perpendicular to the surface of a mirror or any surface

Angle
The amount of bending that a light ray experiences 

Complete the sentences using the following keywords:

Reflection   light   reflected    normal   same    incidence


When Lights hits a mirror, the angle at which it hits is the Incidence as the angle at which it is Reflected. Scientists called this the Law of Reflection. Incorrect science terms, the Reflection Law states that the angle of Normal is equal to the angle of Same when measured from the Reflection.


Diagram


Research Task:

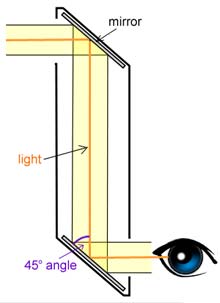
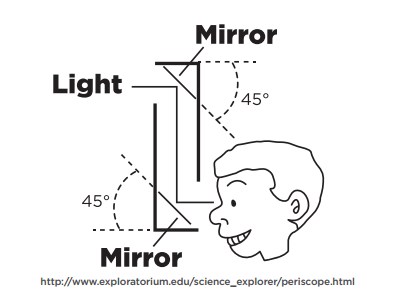
  1. What is a periscope? Is an optical instrument that uses a system of prisms, Lenses or mirrors to reflect images through a tube. 
  2. How does it work? Light from a distant object strikes the top mirror and is then reflected at an angle of 90 degrees down the periscope tube.
  3. Draw and label a periscope?
    Science Club - PeriscopesPeriscopes - Science World


Tuesday, 1 September 2020

Science Introduction

The topics we will be studying in science are:


  1. Energy Types
  2. Energy Transformation
  3. Waves
  4. Sound
  5. Light
  6. The Eye
  7. Reflection and Refraction of light
  8. Electricity
  9. Circuits
  10. Magnetism

All experiment will use the scientific method. The headings that are used for this will be:


Aim:
Hypothesis:
Equipment:
Method:
Findings:
Conclusion:


Wednesday, 19 February 2020

Testing for Complex sugars - the lodine test

We are doing some testing for complex sugar to see if its protein, complex or simple. I put all the work what we have done on my blog.


Aim To see if different food has simple sugars, complex sugars or protein in.       


Hypothesis  
Apple, I think its protein.
Bread,  I think its complex.
Potato, I think its complex.
Egg,  I think its protein.
Milk, I think It's simple.
 Bread: Complex


Equipment: Test tube, food sample, iodine solution.


Method: 1. place about 2 ml of the sample in a test tube.

          
                             2. Add 3-5 drops of iodine and mix


Result:

Apple and egg there both protein, bread and potato they also both complex and there is the only 1 is simple is the milk.


Conclusion:

This is our first testing for complex sugars, I have 1 friend that is in my group we work together to do this testing and I think we've done very well.


Testing for simple sugars

Today we going to do another test, it's about food like to determine whether it contains simple sugars. I put all information I learn about this test on my blog and I hope u like.


Aim:  To test a sample of food to determine whether it contains simple sugars, complex sugars and protein sugars.


Hypothesis

  • I think that egg is going to be simple sugar.
  • I think that bread is going to be a complex sugar.
  • I think that Apple is going to be a protein sugar.
  • I think that the potato is going to be a complex sugar.
  • I think that glucose is going to be a simple sugar.
  • I think that milk is going to be a simple sugar.


Equipment:  Water bath, test tongs, Benedict's Solution, a sample of food


Method:  


1.  Place about 2 ml of the sample into a test tube and then add 5 drops of Benedict's Solution.
2.  Heat with a water bath until it changes colour, Do not boil.


Result:

For the apple, bread, and potato they change colour to look at the picture and u can see what colour it is.

For the egg.gluecose and milk, u can see that the colour stay and didn't change and there is white on the top and the bottom is blue.

The three top picture is egg, milk, and glucose.
The three bottom picture is apple, bread, potato.


Conclusion: 

As u can see in the photo some of them are the normal colour and some of them mixing colour, the one who is in the photo is m partner we work together as a group to do this testing. After we have done the testing I take photos of each of our testing and put it on our blog so u can see what have we done.

Tuesday, 24 September 2019

Hurumanu- Science Laboratory introduction

Welcome to our new room and new science class, we were blogging about the rules of this science class and what we don't need to do. What is the right thing to do and what is the bad thing to do in our new science room.


Aim: To learn about the expected behaviour in a science laboratory.


Our R9 Class Treaty
  1.   Bags under your desk.
  2.   No food or drink.
  3.   No running.
  4.   Don't touch experiments.
  5.  Report any breakages or spills.
  6.   Do not taste or sniff anything.
Safety in a laboratory.

teacher   shoes   practical  teacher laboratory   ask  sniff teacher  breakages 
  1.   Follow the instructions given to you by the  Teacher.
  2.   You must not enter the laboratory without your  Teacher.
  3.   Report all Breakages to your teacher.
  4.   You must never eat or drink in a Laboratory
  5.  Shoes must be worn at all times.
  6.   If you spill something you should tell your teacher immediately.
  7.  You should wash your hands after every Particle activity.
  8. You should know what you are doing. If in doubt ask our teacher.
  9. Never taste or sniff chemicals.
In your group, discuss how the following scenarios could be dangerous.
  1. Not putting your bag under your desk.
  2. Running around in the laboratory.
  3. Not wearing shoes in a laboratory.
  4. Shaking a test tube with your thumb over its mouth?
How do we work in this laboratory?
  1. Beginning and End of class: Lining up, Entry, Seating, 
  2. Equipment tray: equipment list and details.
  • Test tube - This is used for experiments using liquids. They have a bung that can be placed in the top. Test tubes sit in a test tube rack.
                                                                            

Test tube
Credit: https://www.indiamart.com/proddetail/laboratory-glass-test-tubes-16532182312.html


  • Conical Flask - This is used for experiments with liquid up to 150 ml. The flask has a rubber bung for the top and the glass is heatproof.


Image result for conical flask
Conical Flask
Credit:


    • Glass Stirring rod - This is a 20cm glass rod used to stir and mix any liquids together.

    Image result for glass stirring rod
    Glass Stirring Rod
    Credit:


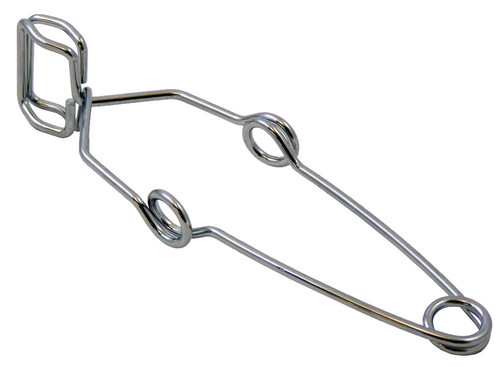
      • Test tube tongs - These are used to hold a hot test tube after an experiment.


        Image result for Test tube tongs
        Test Tube Tongs
        Credit:


            • Spatula - This is for holding very small amounts of chemical powders.

            Image result for spatula science
            Spatula Science
            Credit:


                        • Funnel - used to channel liquids into a smaller container.


                        Image result for funnel science
                        Funnel Science
                        Credit: 


                              Image result for Measuring Cylinder
                              Measuring Cylinder
                              Credit:
                            • Measuring Cylinder - This is used to measure liquids for experiments. The liquids will be poured into a beaker or test tube once measured out.